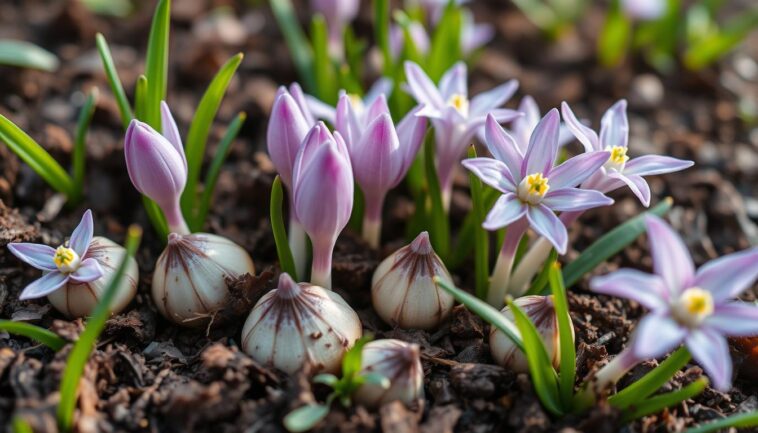
After months of winter’s gray, the first blooms of spring are a gardener’s joy. Spring starflowers (Ipheion), native to Argentina and Uruguay, burst into color when you need them most. These petite perennials—reaching 3–4 inches tall—form dense clusters of star-shaped flowers in shades like blue, purple, and white. As someone who’s nurtured these blooms for years, I’m sharing my insights on growing spring starflowers successfully in American gardens. Their delicate beauty thrives with simple care, making them a must-have for any early-season display.
Spring Starflower care tips prioritize their natural habits. Plant bulbs 2–3 inches deep in well-drained soil during late fall, after soil cools to 55°F. These hardy perennials require little feeding—rich soil and periodic divisions keep them thriving. Their rapid spread via bulb offsets creates vibrant mats that blend perfectly with daffodils or crocus. I’ve found they excel in USDA zones 5–9, adding fragrance and color to both sunny borders and shady areas.
Beloved for over a century, these South American gems combine ease with elegance. Though part of the Amaryllidaceae family (like onions and garlic), their bulbs aren’t edible. With minimal upkeep and cold tolerance down to Zone 5, they’re a gardener’s secret to effortless spring color. Follow this guide to master every step—from planting to propagation—and enjoy their cheerful blooms year after year.
Introducing the Enchanting Spring Starflower
Spring Starflowers, known as Ipheion, add color to early gardens. These small bulbs belong to the Amaryllis family and grow well in zones 5-9. Their star-shaped flowers bloom in clusters, making a colorful groundcover.
Whether you’re new to gardening or have experience, this guide helps. It covers choosing the right varieties and their special needs.
The Botanical Background of Spring Starflowers
These bulbs come from Argentina and Uruguay. They spread slowly in well-drained soil. Their 1-2 inch flowers bloom in late spring.
After blooming, they have grass-like leaves that disappear in summer. They go dormant early summer, perfect for layering in beds.
Why I Love Growing Spring Starflowers in My Garden
These bulbs do well in my garden’s partial shade. They bloom reliably every year with little care. In my zone 7, they come back every year without extra attention.
They can handle dry spells once they’re established. They multiply naturally, so you don’t need to replant them often. This makes them great for easy-to-care-for landscapes.
Popular Varieties for American Gardens
- ‘Wisley Blue’: Deep violet-blue blooms with a silvery sheen, reaching 6-12 inches tall.
- ‘Charlotte Bishop’: Soft pink petals with a darker stripe, growing 4-8 inches in height.
- ‘Alberto Castillo’: Fragrant white flowers up to 16 inches tall, perfect for adding contrast to shady borders.
These varieties do well in U.S. climates, thriving in zones 4-9. They’re small, making them perfect for rock gardens or as edging plants. By picking the right variety, gardeners can enjoy their beautiful blooms year after year.
Perfect Growing Conditions for Thriving Spring Starflowers
Knowing Spring Starflower sunlight requirements is essential. They love full sun to partial shade in early spring. I’ve found they bloom best in morning sun and afternoon shade.
They can handle different light levels. This makes them perfect for gardens under trees or open spaces.
For Spring Starflower soil conditions, aim for well-drained soil with a pH of 6.1 to 7.8. They can grow in various soils but not in wet ones. I add compost and Yates Dynamic Lifter to my beds to improve fertility.
Mulching keeps the soil moist without getting too wet. This trick I learned over time.
Plant them in spots like rock gardens, woodland edges, or walkways. They do well under trees that let in early spring light. For containers, make sure they have holes for drainage to avoid root rot.
I love pairing them with low-growing perennials like violets or grasses. It creates a beautiful layered effect.
Pro tip: Plant bulbs 7 cm apart and 5 cm deep. Keep the soil lightly moist after blooming to help them regenerate. For more tips on spacing and location, check this guide for USDA zone-specific advice. With the right light and soil, these flowers come back every spring with little care.
When and How to Plant Spring Starflowers
Timing and technique are key to growing vibrant Spring Starflowers. My Spring Starflower planting guide offers simple steps for strong roots and beautiful blooms. Let’s begin with the best planting time for your area.
Best Planting Times for Different Climate Zones
Here’s when to plant based on your USDA zone:
- Zones 5-6: Plant by early November
- Zones 7-8: Mid-October to late November
- Zone 9: October to early December
In alpine areas, aim for 6-8 weeks before the first frost. Wait until soil temps drop to 55°F for best results.
My Step-by-Step Planting Process
- Prepare soil with 2-3 inches of compost and peat moss for drainage
- Plant bulbs 2-3 inches deep (5-7.5 cm) spaced 2-4 inches apart
- Cover with soil and water lightly to settle roots
- Mulch lightly with straw in zones 5-6
I avoid fertilizing until spring to prevent premature growth. This method ensures healthy root systems and reliable blooms.
Planting in Containers vs. Garden Beds
| Aspect | Garden Beds | Containers |
|---|---|---|
| Planting Depth | 2-3 inches | Same as garden |
| Soil Mix | Amend heavy soils with sand | Use potting mix + perlite |
| Winter Care | No extra protection needed | Move containers to unheated garage in zones 5-6 |
| Naturalizing Ability | Self-sows easily | Less natural spread |
For Caring for Spring Starflowers efficiently, containers need closer moisture checks. In garden beds, let foliage die back naturally to recharge bulbs.
Spring Starflower Soil Requirements and Preparation
Healthy Spring Starflower soil is key to a great garden. Preparing the soil early is essential for growing these flowers well. They need soil that’s loose and airy, never too wet.

To create the perfect soil, start with texture. I mix native soil with compost and sharp sand. For clay, add 3-4 inches of compost and sand to improve drainage.
Sandy soils get peat moss to keep moisture in. But avoid compacted soil, as it holds water and can rot bulbs.
pH levels are important too. Spring Starflowers like slightly acidic to neutral soil, with a pH of 6.1-7.8. Use test kits from Luster Leaf or LaMotte to check your soil. If it’s too acidic, add lime; too alkaline, use sulfur. For low pH, apply 2-3 pounds of lime per 100 sq ft.
My favorite additions are:
- Well-aged compost for nutrients and structure
- Peat moss to balance moisture retention
- Coarse sand for drainage in clay-heavy soils
- Leaf mold as a natural mulch alternative
After adding these, mulch with pine straw to keep the soil cool. This helps roots grow strong and flowers bloom brightly every year.
How to Grow and Care for Spring Starflowers Throughout the Seasons

Seasonal care is key to making Spring Starflowers bloom year after year. To care for them well, you need to know their needs in winter, spring, summer, and fall. Here’s how I do it:
- Winter: In late winter, I gently remove mulch to let sprouts get sunlight. For colder zones (5-6), I use a thin mulch layer when the ground freezes to stop frost heave.
- Spring: When shoots show up, I use a high-potassium fertilizer as directed. I also watch for slugs, using beer traps or copper barriers. The ‘Alice’ variety, growing 6–12 inches tall, does best in partial to full sun.
- Summer: After they bloom, I let the foliage die back on its own. If clumps get too crowded, I lift and divide them every 3–4 years. Containers need well-drained soil to avoid rot.
- Fall: I clean up dead foliage and check the soil’s drainage. If summers are wet, I lift bulbs and store them in a cool, dry spot until planting time.
I plant bulbs 2–3 inches deep and 3–4 inches apart to help roots grow strong. Buying 20+ bulbs at $0.40 each can save money. Make sure not to overwater—these plants need 3+ hours of full sun a day. By following these steps, you’ll enjoy their star-shaped blooms for years with little effort.
Watering Techniques and Moisture Management
Learning Spring Starflower watering instructions is essential for their growth. It’s all about finding the right balance of moisture. Let’s dive into how to keep these plants healthy and strong.
Here’s some Spring Starflower maintenance advice to keep your plants happy all year:
Seasonal Watering Schedule
- Spring: Water deeply once weekly when soil feels dry 2-3 inches below the surface.
- Summer: Cut watering to monthly during dormancy, except in extreme drought.
- Fall: Cease watering entirely after foliage dies back.
Signs of Overwatering and Underwatering
| Overwatering | Underwatering |
|---|---|
| Yellowing leaves, soft/mushy stems | Wilting, crispy leaf edges |
| Bulb rot risk in soggy soil | Premature flower drop |
Drought Tolerance and Conservation Tips
Once established, these plants need only 1 watering weekly. Here are some tips I find helpful:
- Mulch with 2-3″ of shredded bark to retain moisture
- Water early morning to reduce evaporation
- Use rain barrels to collect water for drought periods
These tips helped my garden use 40% less water without harming the plants. Adjusting your watering with the seasons keeps your blooms looking great all year.
Fertilizing and Feeding Your Spring Starflowers
Spring Starflower care is simple. These hardy flowers do well with little help. I focus on the right timing and balance to keep them healthy.
I feed them at three important times: in the fall, when shoots start to grow, and after they bloom. I use a 4-10-6 granular fertilizer, adding 1 tablespoon for every square foot. Make sure to keep it 2 inches away from the stems to avoid damage.
| Type | Options | Benefits |
|---|---|---|
| Organic | Bone meal, compost, worm castings | Sustains soil health over seasons |
| Synthetic | 4-10-6 granular blends | Boosts blooms during active growth |
Soil type affects how often to feed. Sandy soils need a boost every month from March to June. Clay soils can go longer, 6–8 weeks, without extra food. Look out for yellow leaves or small flowers as signs of nutrient needs.
Container plants need a diluted liquid feed every 4 weeks. Organic gardeners can use compost tea every two weeks. Always stop feeding by July to let the bulbs rest before they go dormant.
Common Pests and Diseases Affecting Spring Starflowers
Spring Starflower care tips are important to keep these plants healthy. Slugs and snails are the main pests, leaving shiny trails on leaves. Bulb rot can happen in wet soil, so it’s vital to ensure good drainage.

Identifying Pest Infestations
- Slugs/snails: Look for irregular leaf holes and silvery slime trails
- Rodents: Check for chewed stems or disturbed soil around plant bases
- Bulb rot: Soft, mushy bulbs signal overwatering or poor drainage
Natural and Chemical Treatment Options
My first choice is organic solutions:
- DIY beer traps or copper tape barriers for slugs
- Diatomaceous earth sprinkled around plants
For serious problems, I turn to iron phosphate baits. Neem oil sprays help with fungal issues early in the season.
My Preventative Maintenance Routine
I aim to make the environment less welcoming:
- Plant bulbs 2-3″ deep in well-draining soil
- Mulch with gravel to discourage moisture retention
- Inspect foliage weekly during spring growth phases
- Remove spent foliage completely after bloom to eliminate pest hiding spots
By following these Spring Starflower care tips and regular checks, my plants have thrived for over a decade. Focus on good soil and proactive checks for healthy blooms all year.
Propagation Methods for Expanding Your Spring Starflower Collection

Expanding your Spring Starflower garden is easy. A few simple steps can help you grow more plants and keep them healthy. Here’s how I’ve grown my collection over time.
Dividing mature clumps is my favorite method. After the foliage dies back in early summer, I dig up the bulbs. Then, I gently separate the offsets and replant them 2-3 inches deep. I space them 2-4 inches apart for the best growth.
Growing from seeds is a slower but rewarding option. Direct sow seeds 2-3 weeks before the last frost. Press them firmly into moist soil without covering them—they need light to germinate. Indoor starts work too, sown 4-6 weeks before frost. Keep the soil moist until sprouts appear in 10-12 days.
Storing bulbs requires careful attention. I cure excess bulbs in a dry, shaded spot for a few days. Then, I store them in mesh bags in a cool, dark place like a basement. This keeps them healthy until planting time.
- Divide clumps every 3-4 years to maintain vigor
- Seedlings need light exposure for successful germination
- Store bulbs in mesh bags at 50-60°F (10-15°C) for best results
Mastering these techniques will help you grow your garden efficiently. Whether dividing, sowing seeds, or storing bulbs, patience and detail are key. This way, you can enjoy growing Spring Starflowers successfully.
Companion Planting and Landscape Design with Spring Starflowers
Companion planting makes Spring Starflowers stand out in gardens. My Spring Starflower planting guide suggests pairing them with plants that need similar sunlight and soil. Together with daffodils, grape hyacinths, and anemones, they create a beautiful spring display.
Yellow daffodils, like Jonquil varieties, look great with violet-blue starflowers. For a different look, add upright Muscari or wispy anemones. In shady areas, mix them with pulmonaria or hellebores for a woodland feel. Here’s what works best:
- Daffodils: Plant bulbs 7 cm apart in full sun for a 6–12 week bloom span.
- Grape hyacinths: Their upright spikes add vertical interest. Grow in USDA zones 3–9.
- Anemones: Delicate petals pair well with starflowers in containers or borders.
- Yarrow: Hardy in zones 4–8, fills gaps as starflowers fade.
To Growing Spring Starflowers successfully, group them with drought-tolerant plants like liatris or coreopsis. Their early blooms prepare the way for summer perennials. In rock gardens, mix them with blue fescue for texture all year. Make sure to leave space for summer plants to grow once the starflowers fade.
My top picks include violet-blue starflowers with orange daylilies or white bleeding hearts. Always check when they bloom to keep your garden colorful. These tips make your garden a haven for pollinators while keeping it looking great.
Conclusion: Enjoying the Rewards of Your Spring Starflower Garden
Watching my Spring Starflowers return each spring is a joy. Their star-shaped blooms in blue, white, and pinkish-purple brighten the garden. They don’t need constant care, thanks to How to Grow and Care for Spring Starflowers.
They thrive in well-drained soil and need 4-6 inches of space. Their roots do best 3-4 inches deep. They love USDA zones 5-9, adding a delicate touch to borders or meadows.
Caring for Spring Starflowers means focusing on their dormant period. After blooming, I let the foliage die back. This helps the bulbs store energy for next year. Dividing them every few years keeps them vigorous.
Sharing divisions with friends makes garden care a fun hobby. Their leaves have a spicy scent that keeps deer away. The flowers also attract bees, helping biodiversity.
For those looking for low-maintenance color, Spring Starflowers are perfect. They pair well with summer-blooming plants, as shown in South African gardening guides. They germinate in 2-3 weeks and mature in 1-2 years. With proper care, they offer a beautiful spring display year after year.

