Green beans have become one of my favorite vegetables to grow in containers. They are easy to care for, produce abundant harvests, and bring a fresh crunch to my meals. Over the years, I’ve refined my process for growing healthy, productive green bean plants, and I’m excited to share my tips with you.
Choosing the Right Container
Green beans come in two main types: bush beans and pole beans. Bush beans are compact and great for smaller containers, while pole beans require vertical support but can yield more in limited space. No matter the type, I make sure to use a container that is at least 12 inches deep and 12-18 inches wide.
For pole beans, I prefer larger pots with a built-in trellis or stakes so the vines have something to climb. Fabric grow bags, wooden planters, and plastic pots all work well, as long as they have good drainage to prevent root rot. I also ensure the containers are made of durable material that retains moisture while allowing airflow, like terracotta or thick plastic.
Picking the Best Green Bean Variety
Not all green beans grow well in containers, so I focus on varieties that thrive in small spaces. Some of my favorites include:
- ‘Contender’ – A fast-growing bush variety that produces tender, flavorful beans.
- ‘Provider’ – An early-maturing, disease-resistant bush bean.
- ‘Blue Lake’ – Available in both bush and pole forms, this variety is known for its delicious, stringless beans.
- ‘Kentucky Wonder’ – A prolific pole bean that grows vigorously and produces tender pods.
- ‘Mascotte’ – A compact variety bred specifically for container gardening, producing tasty, crisp beans.
Preparing the Soil
Green beans prefer light, well-draining soil with a slightly acidic to neutral pH (6.0-7.0). I use a high-quality potting mix combined with compost to provide the nutrients my plants need.
Unlike zucchini, green beans don’t require heavy fertilization since they fix nitrogen in the soil. However, I add a small amount of balanced organic fertilizer at planting time to give them a healthy start. To improve drainage and aeration, I mix in perlite or coconut coir, which helps keep the roots from becoming waterlogged.
Planting Green Beans
I prefer to direct sow seeds rather than using transplants, as beans don’t like to have their roots disturbed. I plant bush beans about 4 inches apart and pole beans 6 inches apart, pressing the seeds about 1 inch deep into the soil.
If I’m growing pole beans, I set up a trellis, stakes, or a tomato cage at planting time to support their climbing vines. I also rotate planting spots every season to prevent soil depletion and reduce the risk of disease.
Watering and Mulching
Beans prefer consistent moisture, but they don’t like soggy soil. I water deeply when the top inch of soil feels dry, usually about 2-3 times a week, depending on the weather.
To retain moisture and keep the soil cool, I add a layer of mulch like straw, shredded leaves, or grass clippings. This also helps prevent soil from splashing onto the leaves, which reduces the risk of disease and keeps weeds at bay.
Sunlight and Temperature
Green beans love warm weather, so I place my containers in a spot that gets at least 6-8 hours of direct sunlight per day.
They grow best in temperatures between 65°F and 85°F, so I wait until after the last frost to plant them and protect young seedlings from unexpected cold snaps. If the weather gets too hot (above 90°F), I provide some afternoon shade to prevent stress.
Fertilizing for Maximum Growth
Since green beans fix their own nitrogen, they don’t need frequent fertilization. I avoid high-nitrogen fertilizers, as they encourage leafy growth at the expense of bean production. Instead, I apply a light organic fertilizer once when the plants start flowering.
Every few weeks, I also apply compost tea or a seaweed-based foliar spray to boost overall plant health and encourage strong pod formation.
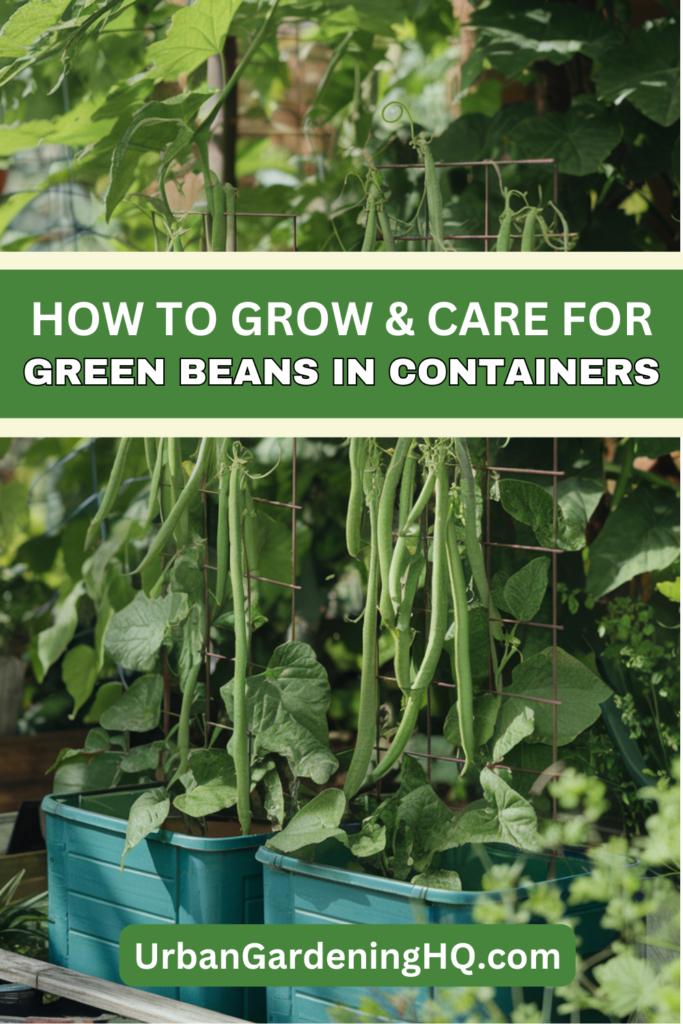
Supporting Pole Beans
If I’m growing pole beans, I gently train the vines to climb their support system. I use stakes, a trellis, or even bamboo poles tied together like a teepee. This helps maximize space and improves air circulation, reducing the risk of disease. I also pinch off the growing tips when the vines reach the top of the trellis to encourage lateral growth and more pod production.
Preventing Pests and Diseases
Container gardening helps keep pests under control, but I still watch for common bean problems like:
- Aphids – I spray them off with water or use neem oil.
- Spider mites – I keep humidity levels up and wash the leaves regularly.
- Bean beetles – I handpick any beetles or larvae I find on my plants.
- Fungal diseases – I ensure proper spacing and airflow to keep leaves dry.
- Slugs and snails – I place crushed eggshells or diatomaceous earth around my containers to deter them.
Companion planting also helps—growing marigolds, basil, or nasturtiums nearby can deter pests naturally.
Harvesting Green Beans
One of my favorite things about growing green beans is how quickly they produce! I start harvesting when the pods are 4-6 inches long, before the beans inside get too large and tough.
I use scissors or garden shears to cut the beans rather than pulling them, which helps avoid damaging the plant. Picking regularly encourages the plant to keep producing for weeks. If I leave beans on the plant too long, they slow down production, so I make sure to check daily once they start fruiting.
Storing and Using Green Beans
Fresh green beans taste best when eaten right away, but if I have a surplus, I store them in the refrigerator in a perforated plastic bag for up to a week. For longer storage, I blanch and freeze them, or pickle them for a delicious snack.
Final Thoughts
Growing green beans in containers is one of the easiest ways to enjoy fresh, homegrown vegetables—even in small spaces. Whether you choose bush beans for a compact patio setup or pole beans for vertical gardening, you’ll be rewarded with an abundant harvest.
If you haven’t tried growing green beans in containers yet, I highly recommend it. With a little care and attention, you’ll have crisp, delicious beans to enjoy all season long. Happy gardening!