Of all the herbs I grow, lemon balm holds a special place in my garden—and in my heart. Its crisp lemony scent instantly lifts my mood, and I love using it in teas, infused waters, or simply brushing against it as I walk by. The best part? Growing lemon balm from cuttings is almost effortless. I started mine from a single stem shared by a fellow gardener, and now I have thriving pots full of it on my balcony.
If you’re looking for a low-maintenance, aromatic herb to grow at home, lemon balm (Melissa officinalis) is an excellent choice. Whether you’re a complete beginner or just want to expand your herb collection without spending on nursery plants, starting lemon balm from cuttings is a satisfying way to multiply your plants—and your joy.
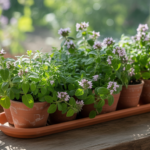
Choosing the Right Container for Lemon Balm
Since I grow most of my herbs in containers, lemon balm is no exception. I’ve found that lemon balm thrives in medium to large pots where its roots have room to spread, but not so large that the soil stays soggy. I usually go for containers that are about 10 to 12 inches wide, with solid drainage holes at the base. Terracotta is great for breathability, but in warmer climates, I sometimes opt for glazed ceramic or thick plastic pots to retain a bit more moisture.
Growing lemon balm in containers also lets me move the plant around as needed—into full sun during spring and morning shade during intense summer heat. It’s an herb that adapts well to its environment, as long as it doesn’t sit in waterlogged soil.
Selecting and Preparing the Cuttings
The first time I propagated lemon balm, I was nervous about whether it would root. But to my surprise, it behaved just like mint—fast, eager, and practically foolproof. Here’s how I prep my cuttings:
- Choose a healthy, non-flowering stem that’s around 4 to 6 inches long.
- Use clean, sharp scissors or pruners to cut just below a leaf node.
- Strip off the lower leaves on the bottom half of the stem to expose the nodes where roots will grow.
It’s important to avoid any woody or overly mature stems—they don’t root as easily. Aim for younger growth, which is usually more vibrant and flexible.
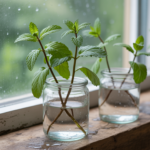
Rooting the Cuttings in Water
You don’t need rooting hormone or fancy tools to root lemon balm. I simply fill a small jar or glass with room-temperature water and place the prepared cuttings inside, making sure at least one or two bare nodes are submerged. I keep the jar on a bright windowsill where it gets indirect sunlight.
I change the water every few days to keep it fresh and prevent bacterial buildup. Within 5 to 10 days, tiny white roots begin to emerge. Once those roots are about 1 to 2 inches long, the cuttings are ready to be transplanted into soil.
Watching roots develop is one of my favorite parts of propagation. It’s a small miracle that never fails to make me smile.
Transplanting Rooted Cuttings into Soil
Once the roots are well developed, I prepare a pot with light, well-draining potting mix. I usually add a bit of compost for nutrients and a handful of perlite for extra drainage. Lemon balm likes rich soil, but it won’t tolerate soggy conditions—so drainage is key.
I make small holes in the soil and gently place the rooted cuttings inside, covering the roots completely and firming the soil around them. After planting, I water the pot thoroughly to help the roots settle in.
I keep the newly potted plants in partial shade for the first few days while they adjust. Within a week or two, they usually perk up with new growth and begin filling out the container.
Caring for Lemon Balm in Containers
Once established, lemon balm is incredibly easy to maintain. Here’s how I keep my plants happy and productive:
Watering
Lemon balm prefers evenly moist soil, especially during its initial growth stage. I water when the top inch of soil feels dry, usually every couple of days in warm weather. I’m careful not to overwater—too much moisture can lead to root rot or fungal issues.
Sunlight
Lemon balm thrives in full sun to partial shade. I find that about 4 to 6 hours of sunlight a day is ideal. In hotter climates, I give it some protection from the harsh afternoon sun to keep the leaves from scorching.
Pruning and Harvesting
Pruning lemon balm regularly encourages bushy growth. I start harvesting once the plant is around 6 to 8 inches tall. To harvest, I snip just above a leaf node, which stimulates branching. I avoid letting it flower, as this can make the leaves less flavorful. If I see flower buds forming, I pinch them off immediately.
Feeding
Lemon balm doesn’t need heavy feeding, but I give it a monthly dose of diluted liquid fertilizer or compost tea during the growing season. This keeps the foliage lush and aromatic.
Pests and Problems
Lemon balm is generally pest-resistant, but I occasionally spot aphids or whiteflies. A quick spray of soapy water usually does the trick. I also make sure to provide good air circulation around the plant to prevent mildew or leaf spots.
Final Thoughts: Lemon Balm Is a Joy to Grow
Growing lemon balm from cuttings has been one of the easiest and most rewarding propagation projects in my garden. Not only is the process simple and quick, but the end result is a pot full of vibrant, lemony goodness that I use almost daily.
Whether you’re looking to fill out your herb garden, start a calming tea garden, or simply want a cheerful, fragrant plant to brighten your home, lemon balm is a fantastic choice. All it takes is one stem and a little care to grow something beautiful and useful.
So if you have access to a mature plant—or even just a grocery store bunch—give propagation a try. It’s a lovely way to grow your own herbal haven without spending a dime.