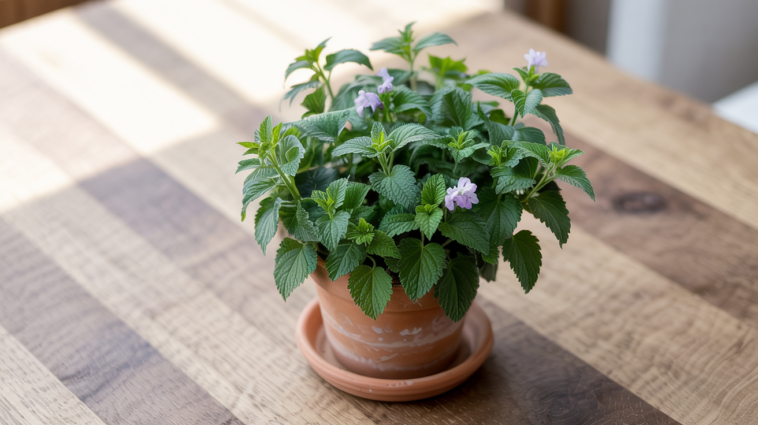
Cat lovers will find catnip plant care in pots perfect. This herb can grow up to 3 feet tall and wide. But in pots, it stays easy to manage.
Following a potted catnip guide helps keep it from spreading too much. It also keeps your cats happy. Plus, you can move the plants outside for sun or bring them inside when it’s cold.
I’ve seen catnip do well in big pots with Miracle-Gro® Potting Mix. Plant them 18-24 inches apart. Use bamboo sticks 2-3 inches apart to keep stems up.
Putting chicken wire around the base protects the roots from digging cats. These steps help it grow well, even in bad soil or when it’s dry.
This guide teaches you to grow catnip from seeds or starter plants. You’ll learn how to water, prune, and divide it to prevent mildew. Whether you buy seeds from Thompson & Morgan or starter plants from nurseries, potted catnip brings joy to your garden without taking over.
Introduction to Catnip: Nature’s Feline Magnet

As a catnip grower, it’s important to know about this herb. Catnip (Nepeta cataria) is a hardy perennial in the mint family. It has fuzzy leaves and spiky lavender blooms. Its secret is nepetalactone, which makes cats playful.
This plant isn’t just for cats. It also repels mosquitoes and attracts bees.
What Makes Catnip So Special?
Catnip is special because it entertains pets and grows well in containers. This makes it easy to control. Its scent is loved by cats but keeps pests away.
The plant’s natural oils make it useful for gardens and homes.
The Benefits of Growing Catnip in Containers
Growing catnip in containers is flexible. You can move plants indoors when it’s cold or keep them safe from pests. Containers also stop the plant from spreading too much.
Here’s why containers are great:
- Easy to move for better sunlight or to keep cats away
- Control over soil and moisture
- Keep plants safe from neighborhood cats while protecting your pets
Understanding the Catnip Plant Lifecycle
Catnip care starts with knowing its life cycle. Seeds sprout in 10-21 days, and plants bloom in summer. They produce purple flowers.
After flowering, cut off leaves to encourage new growth. As a perennial, it comes back every year with proper care. Prune regularly to keep it bushy and extend its life to 3-5 years.
Learning these basics will help you grow a thriving plant. It will be a hit with cats and a great addition to your garden.
Why Growing Catnip in Pots Is Ideal
For cat owners with little outdoor space, a potted catnip guide is a great help. I’ve learned that growing catnip in containers keeps it in check. This stops it from taking over gardens, a big problem in places like Maryland and West Virginia.
Container gardening makes care easier. You can control the soil in pots, like mixing in perlite for better drainage. My cats enjoy fresh leaves all year, and it’s easy to harvest them.
Here’s why pots are the best:
- Easy to rotate for sunlight or shade
- Protects plants from outdoor pests while attracting good insects
- Allows indoor-outdoor flexibility for cats who can’t access gardens
Terra-cotta pots are the best because they dry fast. This stops the soil from getting too wet. Plus, repotting every year keeps plants healthy without needing to redo the garden. Pots make catnip easy to manage and fun for everyone.
Selecting the Right Containers for Your Catnip
| Material | Pros | Cons |
|---|---|---|
| Unglazed clay | Drains well, breathes naturally, prevents rot | Heavy, dries out faster |
| Plastic | Lightweight, affordable, retains moisture | Poor breathability if not porous |
| Ceramic | Stylish, durable | Heavy, may crack in cold |
I suggest using unglazed clay pots for their ability to breathe. They help soil dry evenly, which catnip roots prefer.
Ideal Pot Size and Drainage Requirements
- Choose pots at least 12 inches wide and deep to match catnip’s root spread
- Drill extra drainage holes if existing ones are small
- Add a layer of gravel at the bottom for better water flow
Pro tip: Check soil moisture daily if using plastic pots—they retain heat and moisture longer.
Decorative vs. Functional Container Options
Pair style with function. For patios, try glazed ceramic pots with drainage holes. Fabric pots (like Smart Pots) let roots breathe but may look plain. Mix materials: place clay pots in decorative planters for a polished look.
By focusing on drainage, size, and material, your catnip will grow strong. Follow these catnip potting tips to avoid root rot and ensure healthy growth. A proper container setup is the foundation of any successful catnip container gardening project.
Perfect Soil Mixtures for Potted Catnip
Choosing the right potting soil for catnip is key for healthy growth. Catnip loves loose, airy mixes that feel like its natural home. Heavy garden soil can harm it by compacting and drowning roots.
For the best results, mix 1 part garden soil, 1 part peat moss or coconut coir, and 1 part perlite or pumice. This mix keeps the soil moist but also drains well.
Commercial mixes like Vigoro Potting Mix or cactus blends are great because they drain well. Make sure the soil’s pH is right for catnip, between 6.1 and 7.8. Use a soil test kit to adjust it if needed.
Adding worm castings or compost can help with nutrients. But be careful not to add too much nitrogen, as it can reduce the plant’s essential oils.
Pro catnip potting tips include adding a gravel layer at the bottom of pots. This helps with drainage. Also, repot every 1–2 years to give the roots room to grow. Don’t overwater—wait until the top inch of soil is dry before watering again.
By following these catnip plant care tips, your plants will thrive. Switching to homemade mixes with perlite made my plants fuller and smellier. Remember, good drainage is the most important thing for your catnip to grow well in any container.
How to Grow and Care for Catnip in Pots: A Step-by-Step Guide
Starting your catnip journey? Follow these simple steps for catnip growing tips in pots. I’ve tested these methods, so let’s begin.
Starting Catnip from Seeds
Begin by preparing seeds with a cold treatment. Here’s how:
- Freeze seeds overnight to mimic winter conditions.
- Soak them in water for 24 hours to kickstart germination.
- Sow 1/8 inch deep in seed trays, keeping soil moist. Germination happens in 10–14 days.
- Transplant seedlings outdoors after frost, at the same soil level as in their original pot.
Transplanting Nursery Catnip to Containers
Buying a nursery plant? Gently inspect roots for tangling. Loosen compacted roots to avoid stress. Position the plant at the same depth it was in its nursery pot. This ensures healthy root growth and reduces transplant shock.
Proper Planting Depth and Spacing
Give plants 20 inches of space in larger containers. Plant each seed or seedling 1 per square foot. Firm soil gently after planting and water thoroughly. Proper spacing prevents overcrowding and promotes airflow, key to catnip plant care.
Sunlight and Temperature Requirements for Thriving Catnip
Successful catnip plant care depends on the right mix of light and warmth. These tips help your plant stay healthy and lively all year.
Indoor Light Considerations
For indoor catnip care, where you put it matters a lot. Here’s what to do:
- Put containers near south-facing windows for the most sunlight.
- Rotate plants every week to help them grow evenly and not lean.
- Use fluorescent grow lights for 12–14 hours a day if there’s not enough natural light.
If your plant has long stems or sparse leaves, it’s not getting enough light. Move it to a better spot right away.
Outdoor Placement Tips
When growing catnip in containers outside, keep these tips in mind:
- Choose spots with 6–8 hours of morning sun and afternoon shade in hot places.
- Make sure containers have good airflow to prevent mold and high humidity.
Keep temperatures between 55°F and 85°F. Protect your plants from extreme heat or cold.
Seasonal Light Adjustments
Move containers with the seasons to get the best light. In summer, avoid direct afternoon sun. In winter, move them to sunnier spots or use reflective surfaces like aluminum foil to get more light. Keep an eye on the temperature—catnip likes it between 65°F and 75°F. Move plants to keep them in this range and trim off damaged leaves after hot spells.
Watering Techniques for Container-Grown Catnip

Starting with the basics is key to growing catnip. This herb loves soil that drains well and dries out between waterings. Don’t overwater, as it can cause root rot. Here’s a simple guide to keep your catnip healthy:
- Check soil moisture by inserting your finger up to the second knuckle. Water only when the top inch feels dry.
- Water deeply until liquid flows from drainage holes, then empty saucers to prevent standing water.
- Avoid wetting foliage to reduce fungal risks—direct water at the soil base.
Water mature plants once a week in dry weather, less in winter. Yellow leaves mean too much water, while crispy edges need more. Use pots with holes and light mixes like peat or coconut coir. Adjust how often you water based on pot size. Water in the morning in summer to cut down on evaporation.
My experience shows drip irrigation is best. It waters the roots directly without stressing the plant. Let the soil dry out a bit between waterings. This keeps your catnip happy and healthy.
Fertilizing and Feeding Your Potted Catnip
Feeding your catnip right keeps it lush and fragrant. Organic methods are best for catnip care. Stay away from synthetic fertilizers, as they can harm the scent cats love.
Organic Fertilizer Options
Begin by mixing compost or well-rotted manure into the soil when planting. Here are my top picks:
- Worm castings sprinkled lightly around the base
- Fish emulsion diluted to half strength
- Hoss Complete Organic Fertilizer at planting time
- Seaweed extract for micronutrients
Feeding Schedule Throughout the Growing Season
Follow this schedule for the best results:
- Spring: Apply Hoss Complete at planting (follow package instructions)
- Midsummer: Use Hoss Micro-Boost every 4 weeks
- Autumn: Stop feeding 2 months before frost to harden plants
Don’t fertilize after August. Late feeding can make plants weak to winter damage.
Signs of Over and Under-Fertilization
Look out for these signs to adjust your feeding:
Over-Fertilization: Burnt leaf edges, too much leaf growth with few flowers. My plants got this from too much nitrogen. Fix by flushing soil with water and removing topsoil if salt buildup occurs.
Under-Fertilization: Pale leaves, slow growth. A light compost tea can help struggling plants.
Keep a 5-5-5 NPK ratio during growth. My potted catnip guide now includes checking leaves weekly. Healthy plants have vibrant green leaves with visible oil glands.
Pruning and Maintaining Healthy Catnip Plants

Pruning keeps potted catnip plants bushy and productive. Proper care boosts leaf growth and prevents overgrowth. Here’s how to shape your plant for peak performance:
| Task | Timing & Method |
|---|---|
| Pinch young stems | Spring: Trim 1″ from stem tips to encourage branching. |
| Deadhead flowers | After blooms fade: Cut spent blossoms to redirect energy to leaves. |
| Winter cleanup | Post-frost: Cut back to 2–3″ above soil for regrowth next spring. |
Check your indoor catnip care weekly. Remove brown leaves and roots pushing through drainage holes. Use sharp tools to avoid damage. For catnip growing tips, pinch new growth every 6 weeks to keep plants compact. Over-pruning stresses plants, so never remove more than ⅓ of foliage at once. Stored cuttings root easily in water, creating new plants. Regular trimming ensures your catnip stays tidy and leafy all season.
- Tools: Pruners, clean scissors, gloves
- Signs of Success: Fuller leaves, controlled height
- Avoid: Cutting below leaf nodes
My routine includes monthly checks for root bound plants. Gently loosen soil and trim roots if they coil. Proper pruning balances growth and keeps your indoor catnip care routine simple. Follow these steps to enjoy a thriving, compact plant year after year.
Harvesting and Using Your Homegrown Catnip

After growing your catnip in pots, it’s time to enjoy it. Follow catnip growing tips and How to Grow and Care for Catnip in Pots for a simple harvest. Good catnip plant care means you’ll have plenty all year.
When and How to Harvest for Maximum Potency
Cut stems when they bloom. Harvest in late morning, after dew dries. Cut just above leaf nodes, never more than a third at once. My cats love fresh clippings, and pruning keeps them bushy.
For the best effect, harvest before noon. That’s when nepetalactone levels are highest.
Drying and Storing Catnip
| Method | Steps | Time |
|---|---|---|
| Air-Drying | Suspend stems upside down in a dry, dark area | 2-3 weeks |
| Oven | Spread on a baking sheet at 150°F | 1-2 hours |
| Sun-Drying | Lay on a mesh screen in full sunlight | 1-3 days |
After drying, crush leaves into powder. Store in airtight containers in the fridge. This keeps it potent for up to six months.
Creative Uses Beyond Cat Toys
Use your harvest in many ways:
- Tea: Make a calming herbal tea from dried leaves (safe for humans)
- Insect repellent: Use dried leaves to keep pests away
- Pillow sachets: Mix with lavender for a calming scent
- Companion planting: Plant near veggies to keep aphids away
My cats love DIY toys with frozen leaves. Try different uses to find your favorite!
Troubleshooting Common Catnip Growing Problems
Even with proper catnip plant maintenance, challenges may arise. Here’s how to tackle pests, diseases, and growth issues head-on:
Pest Management for Potted Catnip
- Watch for aphids or mealybugs clustering on stems. Wipe them off with a damp cloth or use neem oil sprays.
- Spider mites thrive in dry conditions. Mist leaves weekly and increase humidity if needed.
- Whiteflies can be trapped with sticky yellow cards placed near plants.
Disease Prevention and Treatment
Overwatering often causes catnip plant care failures. Prevent:
| Issue | Solution |
|---|---|
| Powdery mildew (white powdery patches) | Mix 1 tbsp baking soda with 1 gallon water and spray weekly. |
| Root rot (yellowing leaves, mushy stems) | Repot in fresh soil with added perlite for drainage. Discard infected roots. |
Resolving Growth Issues
For indoor catnip care:
- Cat damage: Protect young plants with wire mesh or bamboo stakes. Hang pots out of reach if cats are persistent.
- Leggy growth: Prune stems by half in spring to encourage bushy growth. Pinch tips regularly.
- Root binding: Repot every 2 years into a container 2-3” larger in diameter to prevent soil compaction.
Regular checks and quick action keep your catnip thriving despite challenges. Always prioritize good drainage and balanced moisture!
Conclusion: Enjoying the Rewards of Your Potted Catnip Garden
Growing catnip in pots is easy and rewarding for both cat owners and gardeners. By following the How to Grow and Care for Catnip in Pots steps, you unlock many benefits. You save money on store-bought herbs and enjoy fresh leaves all year.
Catnip container gardening fits any space. My plants do great indoors, bringing joy to my cats and pride to me.
Catnip is more than just for pets. It can be made into tea for a calming drink. Its oils also keep pests away and attract pollinators. This makes it a great addition to your potted catnip guide.
It grows well with the right sunlight and drainage. Even beginners will find it easy to care for. Drying leaves gives you a steady supply, and pruning keeps it healthy.
This herb is not just for cats. It’s a step into sustainable, easy gardening. So, start your pots today and see your cats and garden grow.


